 Andrey Agibalov
 Problem definition
Together with every build, we need to generate a document that lists all the important classes and their methods, and how these classes are connected with each other. This may seem like a toy problem, but it gives us enough context to learn what tools to look for and what to expect from them.
Solution
In our solution, there are going to be 2 modules:
docs— implementation of all the analysis tools.sample-app— the target application that we want to document.
It’s important to introduce this separation, because docs is a library that only needs to be built once and then can be reused in different applications. sample-app is a toy application we’re going to document.
Document production process
Asciidoctor is a great choice when you want to produce a nice-looking document (in my {% post_link Use-Asciidoctor-to-create-great-publications other post %} I’ve explained why). Asciidoctor is easy to integrate with Gradle using the asciidoctor-gradle-plugin which means that we can just put our documentation sources together with Java sources and run ./gradlew asciidoctor to produce the documentation.
It would be that easy if our documentation had to be entirely written by a human, but in our case we want to generate pieces of document from code, so we’ll have a document like this:
= Sample App docs

== Classes
Sample App has a few classes:
include::{snippetsDir}/classes.adoc[]

== Class diagram
Here's how Sample App's classes connected with each other:
include::{snippetsDir}/class-diagram.adoc[]

The end.
classes.adoc and class-diagram.adoc are the snippets which we’ll generate during the test run. We make Gradle’s asciidoctor task depend on test task — this guarantees that test run artifacts will be there by the moment Asciidoctor starts working. So, the build scenario looks like this:
- Step one: run JUnit tests and produce the
classes.adocandclass-diagram.adocsnippets. - Step two: run Asciidoctor and let it use content from previously generated
classes.adocandclass-diagram.adocsnippets to render the “main” document —docs.adoc.
Producing the snippets
Here’s what our JUnit tests should look like:
public class DocTest {
  private final SnippetGenerator snippetGenerator =
    new SnippetGenerator(new File(System.getProperty("sourceDir")));

  private final SnippetWriter snippetWriter =
    new SnippetWriter(Paths.get(System.getProperty("snippetsDir")));

  @Test
  public void documentClasses() {
    String snippet = snippetGenerator.generateClassesSnippet();
    snippetWriter.writeSnippet("classes.adoc", snippet);
  }

  @Test
  public void documentClassDiagram() {
    String snippet = snippetGenerator.generateClassDiagramSnippet();
    snippetWriter.writeSnippet("class-diagram.adoc", snippet);
  }
}
SnippetGenerator is a service that reads the code and produces the snippet content. Its constructor has a single parameter — path to source code directory.
SnippetWriter is a service that takes the content and writes it to the file. Its constructor has a single parameter — path to the directory where to write snippet files.
By making these paths configurable, we achieve nice integration with Gradle:
ext {
  sourceDir = file('src/main')
  snippetsDir = file('build/generated-snippets')
}

test {
  systemProperty 'sourceDir', sourceDir
  systemProperty 'snippetsDir', snippetsDir
}
How SnippetGenerator works
The big idea behind SnippetGenerator consists of these 2 parts:
- Use QDox to read the code. QDox makes it easy to get all the codebase details we need: classes, methods, Javadoc comments, everything. If you’re not familiar with QDox, take a look at {% post_link Enforce-software-design-with-Checkstyle-and-QDox my other post %} where I show how to analyze Java code using QDox.
- Use EJS and Nashorn to generate snippet contents based on QDox models. EJS is a good choice here, because it allows you to mix templates with raw JavaScript. Nashorn’s runtime environment allows JavaScript to work with Java objects.
Let me illustrate it with pseudocode. Here’s a dummy EJS template:
We have <%= qdox.getClasses().size() %> classes!And here’s the code to render this template:
QDox qdox = new QDox("src/main/java");
nashorn.put("template", readAsText("dummy.ejs"));
nashorn.put("qdoxObject", qdox);
String snippet = nashorn.eval("ejs.render(template, {qdox: qdoxObject})");
Assuming that we had 10 classes in our src/main/java, the snippet will have a value of:
We have 10 classes!How SnippetGenerator actually runs EJS with Nashorn
While the pseudocode above explains what happens, let’s take a closer look at how to actually run EJS on Nashorn. First, EJS needs a global window object to initialize properly. Second, it’s important to make a proxy object for original model object. Here’s the “minimal” EJS runner that does all the heavy lifting:
private static String renderEjs(String templateString, Object model) {
  ScriptEngineManager scriptEngineManager = new ScriptEngineManager();
  ScriptEngine engine = scriptEngineManager.getEngineByName("nashorn");
  engine.put("template", templateString);
  engine.put("model", model);
  engine.eval("var modelProxy = Object.bindProperties({}, model)");
  engine.eval("window = {}");
  engine.eval("load('classpath:" +
    "META-INF/resources/webjars/ejs/2.4.1/ejs-v2.4.1/ejs.js')");
  return (String)engine.eval("window.ejs.render(template, modelProxy)");
}
Our only use-case assumes that model is always the same — a JavaProjectBuilder object, so here is the convenient render() method that loads the template by name and passes the JavaProjectBuilder object to it:
private File sourceRoot;
...
private String render(String templateResourcePath) {
  String templateString = getResourceAsString(templateResourcePath);

  JavaProjectBuilder javaProjectBuilder = new JavaProjectBuilder();
  javaProjectBuilder.addSourceTree(sourceRoot);

  return renderEjs(templateString, javaProjectBuilder);
}
This allows us to provide these 2 convenience methods to the end user:
public String generateClassesSnippet() {
  return render("classes.ejs");
}

public String generateClassDiagramSnippet() {
  return render("class-diagram.ejs");
}
Generating the “list of classes” snippet
Here’s how the template for “list of classes” looks like:
<% load('classpath:utils.js');
var classes = getClasses();
for each (var clazz in classes) {
    if(shouldSkip(clazz)) continue; %>

* `<%= clazz.getName() %>` -- <%= clazz.getComment() %>

    <% for each (var method in clazz.getMethods()) { %>
** `<%= method.getName() %>()` -- <%= method.getComment() %>
    <% } %>
<% } %>
Because our model is JavaProjectBuilder object itself, we call getClasses() as if it was a global function. In real world I would consider moving the querying away from templates — I would build more template-specific models in Java and then just let EJS do the final formatting. I don’t follow this approach in this post to keep it as short and clear as possible.
The shouldSkip() function comes from utils.js. It checks if class is annotated with Javadoc @undocumented tag, and if so, it returns true:
function shouldSkip(clazz) {
return clazz.getTagByName('undocumented') != null;
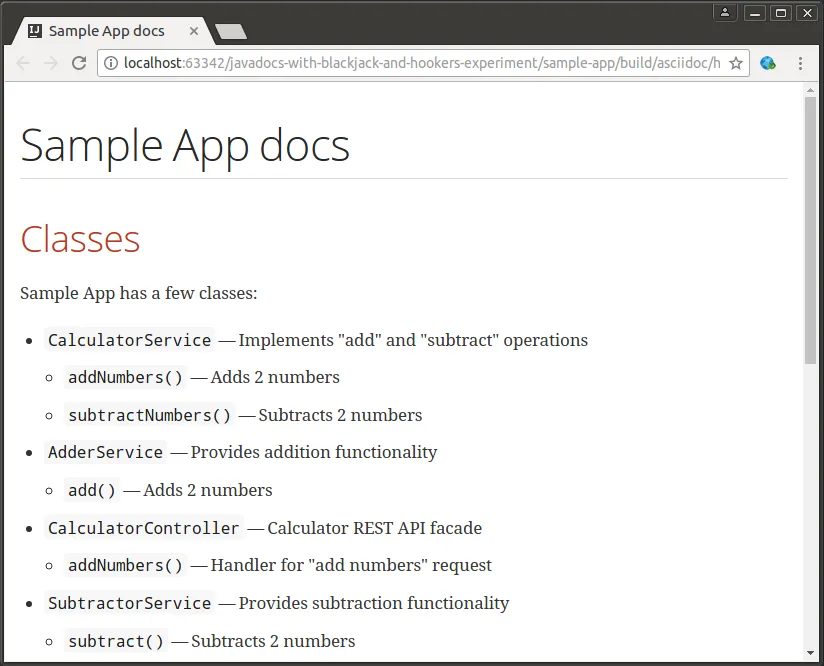
}When we render the classes.ejs template, the result is Asciidoctor markup of a 2-level unordered list:
* `CalculatorService` -- Implements "add" and "subtract" operations
** `addNumbers()` -- Adds 2 numbers
** `subtractNumbers()` -- Subtracts 2 numbers
* `AdderService` -- Provides addition functionality
** `add()` -- Adds 2 numbers
* `CalculatorController` -- Calculator REST API facade
** `addNumbers()` -- Handler for "add numbers" request
* `SubtractorService` -- Provides subtraction functionality
** `subtract()` -- Subtracts 2 numbers
When it gets included into main document and rendered, the final picture looks like this:
Generating the “class diagram” snippet
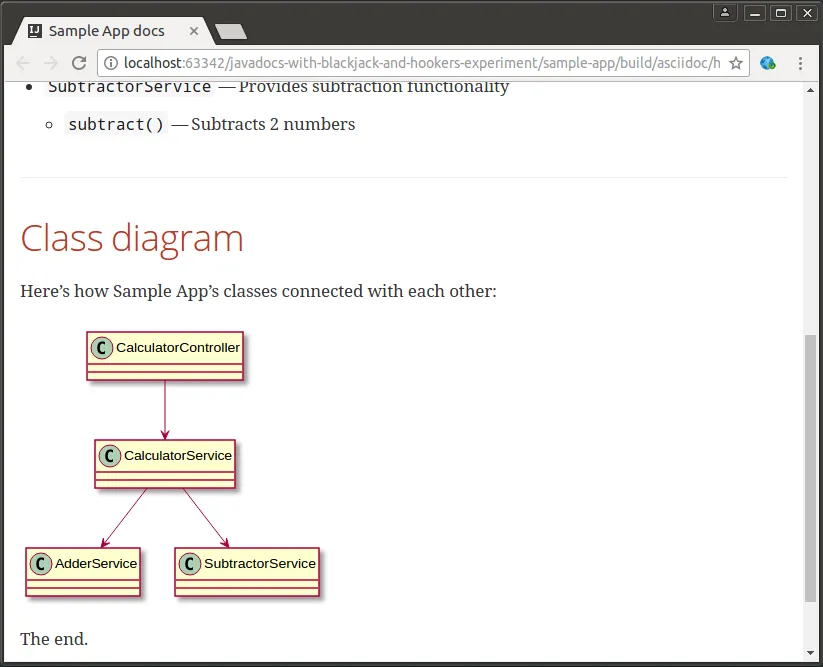
We do a very similar thing to make a class diagram. This time we’re using Asciidoctor’s diagramming support and namely PlantUML syntax for class diagrams:
[plantuml, class-diagram, svg]
----
<% load('classpath:utils.js');
var classes = getClasses();
for each (var clazz in classes) {
    if(shouldSkip(clazz)) continue; %>
class <%= clazz.getName() %>
<% } %>

<%
for each (var clazz in classes) {
    if(shouldSkip(clazz)) continue;

    for each (var field in clazz.getFields()) {
        if(shouldSkip(field.getType())) continue; %>
<%= clazz.getName() %> --> <%= field.getType().getName() %>
    <% }
} %>
----
This template generates a result like this:
[plantuml, class-diagram, svg]
----
class CalculatorService
class AdderService
class CalculatorController
class SubtractorService

CalculatorService --> AdderService
CalculatorService --> SubtractorService
CalculatorController --> CalculatorService
----
Which becomes a nice class diagram when finally rendered:
Conclusion
Building custom documentation is not the most popular task, but when it appears, make sure to come up with a reproducible solution. EJS, Asciidoctor and Gradle make it surprisingly easy to produce pieces of the document during the build. While in this post we were using QDox as a source of data, the approach won’t change significantly if instead of Java code you’ll need to analyze anything else.
See a self-sufficient sample project in this GitHub repository.